

February 7th, 2017
Home of the Future - Part I : Media Network
My wife and I moved into our house about five years ago, afer which we had two kids. The demands on our TV/Media consumption therefore increased significantly. For most of these years we made do with trailing co-ax cables through the house to the master bedroom, sending a poor mirrored signal from a sky box on the lounge TV to the bedroom, but last year I decided my days of living in a One-TV household were numbered.
Around that time, I visualised something like the following diagram. My Holy Grail of a home media network, providing the flexibility to bring any content to any room or device in the house. Today the implementation of this diagram is a reality and was a major step on my “Smart Home” journey…
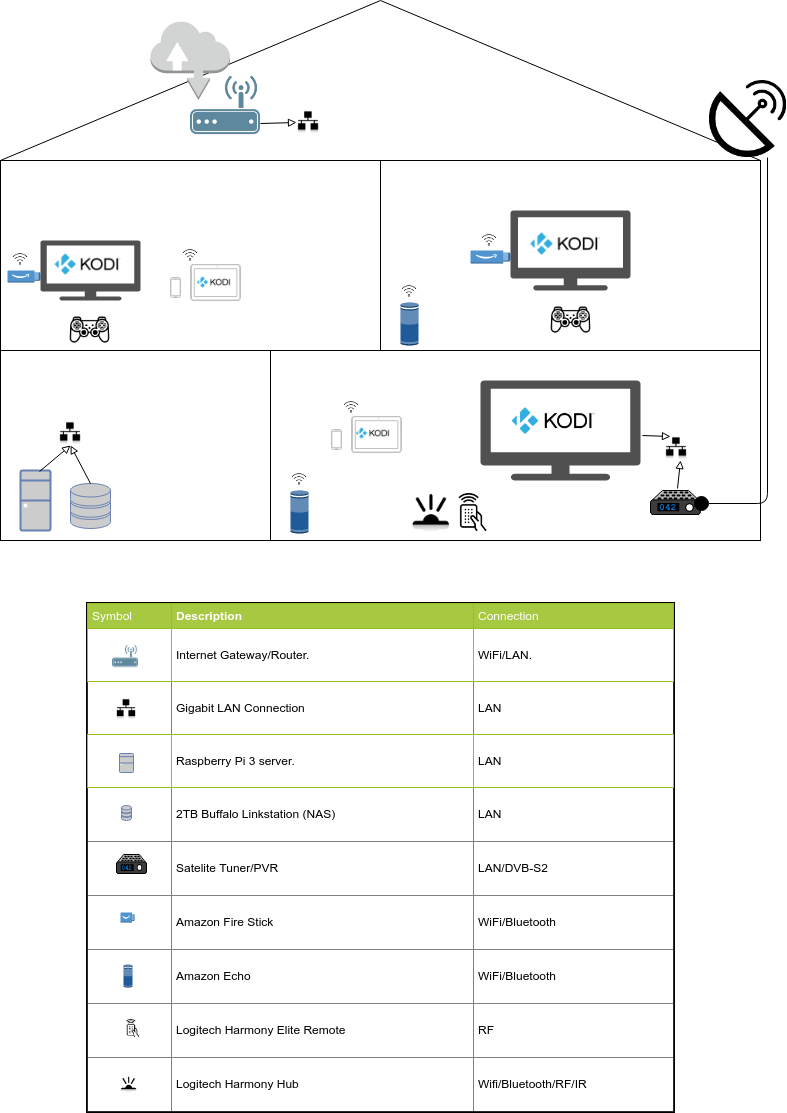
Overview
Here are some of the cool things that can be done on such a Home Media network:
- Play any movie/song from a local media library on any TV/Tablet
- Play streamed services, such as Netflix/Spotify (requires paid subscription), on any TV/Tablet
- Access the EPG, play and record any Free To Air Satelite TV Channels, on any TV/Tablet
- Play a selection of games on any TV
- Turn on/off selected TVs, Adjust volume, switch to selected channels, using voice commands.
- Turn on/off selected TVs, full control of all content, using a mobile phone.
- Use a single remote control, to control multple devices on the main Lounge screen.
Sound good? Well lets go through the key requirements of such a network and their solutions :
Any content to Any device
My main goal was to have the ability to receive media content on any TV in the house, without destroying half the house doing so. We have an old property with solid walls, and I`m not a fan of visible cables, boxes, trunking, etc. The obvious area for investigation therefore became content over WiFi.
Another goal was to spend as little money as possible. I wasn’t about to go out a buy a bunch of new TVs, so any solution had to work with an existing set of devices.
I had two topologies in my head, either a “star topology” network, where all content was transmitted from a central source, and devices were just dumb terminals which received the signal - or - a client on each TV which had the logic to receive/process/control content. The first option would require some super-server which could process incoming control signals, and have the power to stream content to potentially many destinations. The latter option was a more scalable approach, but pushed complexity and cost to the devices.
As usual, the decision was based on what was possible with cheap and available hardware/software… and at this point I introduce Kodi (Free Software) running on Amazon Fire Stick (£30 Hardware).
Kodi is Media Centre software, designed for the big screen. It essentially presents you with a customisable UI, which you can use to select and control playback of many different types of content. Kodi has an ecosystem of plugins (called Add-Ons) which allow interfacing with content from many different sources. So for example… ISO images, MP3 collections, Internet Streamed movies/tv services, TV via an appropriate networked receiver, PVR Recordings, Photos… the list goes on.
Kodi is available on a number of platforms, including Android. Any android device - tablets, phones, tvs, etc - can install Kodi and instantly solve the main problem of receiving content anywhere. How to turn an old tv into an Android TV? An Amazon Firestick! The Firestick is a pseudo-Android device in that Amazon have done their best to avoid allowing users to install their own apps. However, there is an easy way to sideload applications, including Kodi. The firestick is a tiny and cheap device, it fits snugly behind a tv, and if you`re lucky you can even power it off an available USB slot on newer TVs.
So in summary… Kodi Firesticks are awesome!
Easily Extendable
(or… “Centralised Management of Content and Config”)
Adding a TV to the network becomes almost as easy as plugging in a new Firestick. However, there is significant setup and configuration of each new stick, e.g. Install Kodi, Set up kodi config, install Add-Ons, set up streaming accounts, mount NAS, etc. Is is also not desirable to store content on the sticks, ideally everything is streamed from somewhere, either internal to the network from, say, a NAS - or from outside the network from, say, a movie subscription streaming service (e.g. Netflix).
The latter of these problems was the easiest to solve. I made an investment in a Network Attached Storage (NAS) device. This is a 2xTB RAID1 Device, which means you can hold 2TB of data on one disk drive, and it backups everything up automatically to a second disk drive of the same size. I then proceeded to consolidate all my media content onto the NAS.
To address the pain of adding a new stick, I wanted to create a Kodi “Image” that I could roll out across all new sticks. Luckily there is a Kodi Backup Add-On which means that, once configured, an entire image of the installation can be saved out to the NAS. With this, we can simply add a new stick, install kodi, refresh from the backup, and we’re done. It takes me about 5 mins to set up a new stick.
What we don’t want in this backup are Kodi thumbnails. Thumbnails are small images that are auto generated for each movie, song, artist, album, etc - which Kodi uses as part of it’s user interface. These are often pulled in from various internet sources. Over time, and with a lot of content, the libray of thumbnails can grow hugely and become a large part of storage on the stick. Adding a new stick also requires generation of these thumbnails which can mean waiting several hours for the library to be created. Luckily, Kodi has the ability to load these thumbnails in from a central source, a MySQL database to be exact. A MySQL service running in a Docker container was therefore added to a new Raspberry Pi Home Server (which incidentally is also a Kodi device attached to a TV). Now all TVs/Devices in the house pull their thumbnails directly from this server. No more library rebuilds, No more inconsistent thumbnails across devices. Every device shows the same content, in the same way.
Unified User Interface on all devices
A significant requirement for me was to have a simple-to-use interface, in other words it needed to be “wife-proof” (Note, not a general statement, just one about my particualar wife!). Not only that, but I wanted to have the exact same interface on all devices (TV/Tablets/etc), and the exact same way of controlling the interface.
The latter of these requirements is satisfied to a large extent by having a centralised set of config and a common image as described above. In addition, the Amazon Firestick is bundled with a Remote Control, so there is at least a single common control interface across all TVs. (More info below on control methods).
The “simple-to-use” interface took a bit more effort…
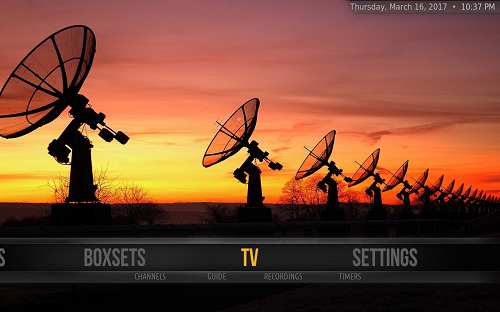
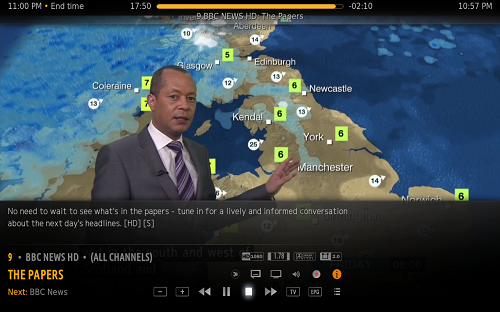
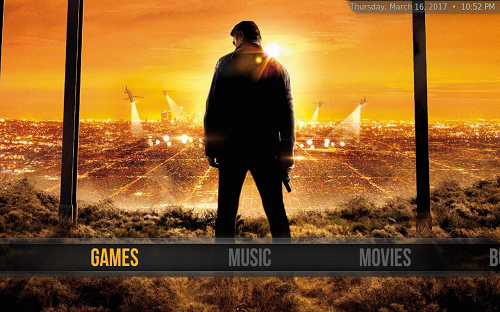
Out of the box, Kodi is not straightforward to use for the non-techincal, i.e. my wife. A standard TV user does not understand, and shouldn’t need to understand, the concept of an Add-on, or a media library, or a stream, etc. Instead they are more familiar with concepts like Movies, TV, Boxsets, Games, Music, etc. I therefore wanted to hide the former concepts from the standard Kodi menu, and create an interface which dealt with the concepts that a TV user would understand. In addition, I wanted it to be pretty, because wife.
This is where things diverted from the usual track. Kodi Skins are completely customisable if you don’t mind diving into the source, but using the standard UI options there is not a lot that can be done. To actually create what I required, I needed to hack about in some of the xml files that make up one of the skins on offer. The skin I began with was called the Amber skin. IMO it is more sleek and attractive than the standard “confluence” Kodi skin, but it is still lightweight enough to avoid impacting the performance of the UI on the limited processing capacity of a firestick.
The details of creating this customised UI are best left for a follow up post, but suffice to say it involved editing the Main Menu xml, adding custom submenus, hiding a lot of the unneeded menu items, and linking directly to AddOn pages etc (to avoid the realisation/knowledge of being inside an AddOn).
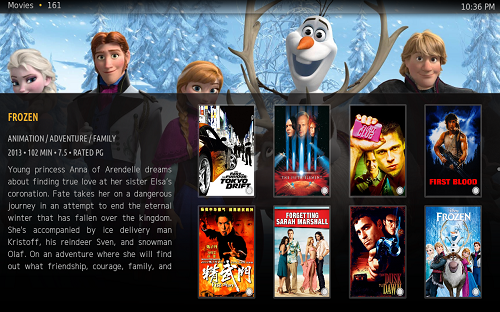
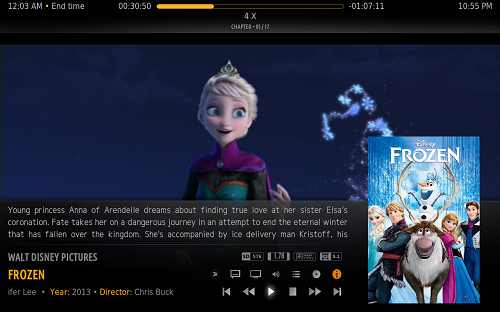
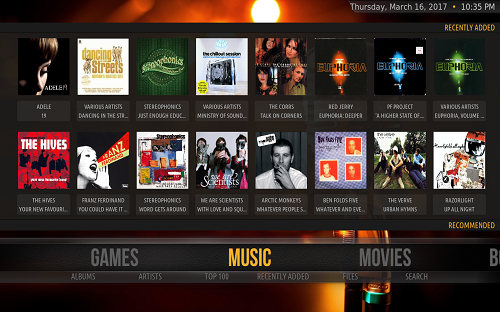
The screenshots below give you an idea what you see, no matter which TV you turn on in the house:


Easy & Automated control of devices
Above I mentioned that each firestick comes with a Remote control. This little remote is awesome enough to gey by with. The only (relatively significant) downside is that the remote does not enable you to power on the TV. This necessitates a further remote to do this, or unthinkably, getting up an pressing the TV power button. ** Side note, I eagerly await a UK supplier that sells this addon gadget for the remote **.
Whilst I can cope with this in other rooms until the appearance of said gadget, I can’t be doing with this in the Lounge, which is the centre of all things laziness. In addition, I also have my Satelite PVR in the same room, so in total I would have to juggle three remote controls. Not an option.
Therefore I have two Lounge Remote solutions in place…
-
For the lazy man who has everything, why not spend £300 on a remote control. I realise earlier I said I was cheap, but some first world problems need solving at any cost.
This is not just any remote control though. The Harmony can talk in multiple languages.. Infra Red, RF, Bluetooh, WiFi. It can control pretty much any device that can be remotely controlled. The remote itself does not directly control a device, instead communication is sent to the Harmony Hub via RF, from where it is relayed to the particular device in the chosen “language”. This has the advantage that you don’t have to point the remote at the TV, you don’t even need to be in the same room (although that would be a bit pointless).
The Harmony helps satisfy another big requirement. Where the TV interface needed to be “wife-proof”, the remote control method needed to “kid-proof”. Our kids are young, and they like to watch kids shows, and change channels, a lot. Until the Harmony came along, I was their remote. The Harmony has a touch-screen, and in this day and age, kids know how to use touch screens. All the channels picons (think channel logos) are available on the touch screen, so all our eldest needs to know is “What is the logo for CBeebies?”. I`ve grouped all the kids channels they watch in one place, he presses the logo on the remote, and the tv takes him to CBeebies. And I get some peace… £300 well spent.
-
“Alexa, Turn on the TV”
Need I say more? The height of laziness is adding an Echo to the repertoire of remote controls. I wish I could say that setting up the echo to perform such a simple command was as a simple as the command itself, but unfortunately Alexa is not great when it comes to learning exact new phrases like this one.
A straightforward workflow of enabling something similar is easy to set up and would look like this :
“Alexa, Tell Harmony to turn on the TV” -> Interface with Logitech Harmony skill -> Start the Harmony activity, “Watch TV” -> Harmony Hub send IR signal to TV and Satelite box, and Bluetooth activation of Firestick.
But why would i want to include the words “Tell Harmony to” ?
Instead a nicer (more complex) workflow is what is implemented…
“Alexa, Turn on the TV” -> Interface with YONOMI from Alexa known devices -> YONOMI Logitech Harmony activity started -> Start the Harmony activity, “Watch TV” -> Harmony Hub send IR signal to TV and Satelite box, and Bluetooth activation of Firestick.
Yonomi is a Smart Home virtual hub. It lives in the cloud, i.e. you need a Yonomi account, and is configured via a phone app. It is used to create new activities by stringing together seqeuences of activities from smart devices (such as the Harmony) that it knows how to connect to.
This whole section is complex and deserves a further post to itself.
Work in progress : I’m currently creating my own Alexa skill to allow custom commands for controlling home devices easily, e.g “Alexa, turn up the TV”, “Alexa, Play Peppa Pig”, “Alexa, Search for Disney Movies”
One last point here worth mentioning is the ability to start the Kodi application when the Firestick is activated. This is achived throught a NodeRED flow on the RaspberryPi server. Briefly, NodeRED is software to allow integration of pretty much anything to anything else. There is a huge community behind this open source project and a myriad of different connectors. In this case, an input connection of a Harmony activity, triggers a connection to the Firestick API to start the Kodi app. More on this in a future post…
Future proof (5+ yrs)
Currently the TVs are old, only two of them are HD and none are 4K ready. I therefore wanted a suitable infrastructure to support a move to 4K, across several TVs in the network. To this end I have installed Gigabit network to certain rooms in the house. Although this feels like a step backwards (a move back towards cables rather than wireless), it will provide scope for 4K+ bandwidth for multiple TVs, plus bandwidth for other future installations, such as CCTV.
I plan to do more work with voice control using Alexa, and also integrating this control with lighting and other automation. For example, as I arrive home my phone sends a notification which turns on house and garden lights, turns on the TV showing a “House Dashboard”, pipes music to in ceiling speakers in the hallway - oh and it should already be nice and warm because the heating would have already been activated when I left my work location!
The future is coming…
Author
